All Categories
Featured
Table of Contents
- – Rv Trailer Rubber Roof Repair Fullerton, CA
- – OCRV Center
- – Rubber Roofing For Campers Fullerton, CA
- – Repair Rv Roof Leak Fullerton, CA
- – Rv Roof Leak Repair Near Me Fullerton, CA
- – Rv Roof Repair Fullerton, CA
- – Replace Rv Roof Fullerton, CA
- – Rv Roof Maintenance Fullerton, CA
- – Rv Fiberglass Roof Repair Fullerton, CA
- – Rv Slide Out Roof Repair Fullerton, CA
- – Rv Slide Out Roof Repair Fullerton, CA
- – Class C Rv Roof Repair Fullerton, CA
- – Repair Rv Roof Fullerton, CA
- – Rv Rubber Roof Replacement Cost Fullerton, CA
- – OCRV Center
Rv Trailer Rubber Roof Repair Fullerton, CA
I figured I would certainly rather have it semi-portable so I went with the cover, plus this allows me to change the elevation backwards and forwards when I require to. Of program the most inexpensive alternative of all would certainly be to just toss an excellent tarp over the top of your RV for rainy days and only deal with warm days! Originally I increased the legs with 1 1/2 PVC pipeline that fit inside the legs and after that I attached a tube clamp around the PVC pipeline to hold up the cover legs.
This is still a little drooping. I probably ought to have forked out for some stiff steel pipeline from the begin.
An old spot work on the Recreational vehicle rubber roof. As you can see, this roofing system has had a whole lot of concerns over the years.
On the bottom is the original EPDM rubber roof layer. I understand it's EPDM rubber and not TPO rubber since of the black backing. On top of my EPDM roof covering is a thin Motor home roofing finish that was used later on.
Rubber Roofing For Campers Fullerton, CA
I simply left the roof finishing stuck to the EPDM roofing and pulled them up together. Starting to peel off roof finishing.
All rubber roofing removed from camper. There was a sticky under the lower layer of rubber that was still rather well stuck in many areas, however with an excellent bit of pressure it peeled off up easily.
If you assume you'll be conserving the roofing system decking plywood (not replacing it), then you might save on your own some cleanup difficulty by removing the fixtures first and after that peeling off up the rubber! Information of water damage on camper roof covering. Extra water damaged locations on motor home roof covering outdoor decking. There was nothing truly awful that made me seem like I was going to drop via, yet absolutely a whole lot of damages and I was obtaining the sensation I would be changing a lot of the roof covering outdoor decking plywood.
Repair Rv Roof Leak Fullerton, CA
I went for the simplest one initially, an air vent cap from a kitchen sink pipes vent pipeline. There is no other way around this, you simply have to begin excavating till you reveal the screw heads.
Loosening the screws in air vent cap. The screws on this air vent cap were hex-head steel screws so I used a small outlet chauffeur to remove them.
I found an old wasp nest inside the air vent cover. This is a view I'll most likely have actually to get made use of to, locating the remains of pet habitation in every space and cranny. I invest a dreadful great deal of my time producing great wild animals habitat in my lawn so I don't obtain angered when a creature selects to set up home in my motor home.
Rv Roof Leak Repair Near Me Fullerton, CA
Thankfully no one was home in this old nest so I just threw it. You must attempt not to damage these pieces (like vent covers and caps) as you're scuffing off the old caulk and sealer simply in instance you need to use them once again.
My roofing air vent additionally had an air vent cover over it. Beginning on the roof covering air vent. Hardware revealed on roof covering air vent cap, the initial nut came off clean.
The bolts on this Recreational vehicle roof air vent cover were nuts on tiny screws. The 2nd one just started spinning, implying the bolt was not repaired in location however turning along with the nut. A peek at the equipment holding down the roof air vent cover.
Rv Roof Repair Fullerton, CA
I didn't have any kind of excellent way to hold the bolt in position so rather I opted to saw via the bolts with a reciprocating saw. Sawing via screws on roofing system vent cover. I utilized a cordless reciprocating saw with a metal-cutting blade yet it was tricky to get the blade level adequate to reach the screws so near the roof covering deck.
Flexing the blade a little bit to get to close to the roofing deck. Cover removed from roof vent.
Many were so old and rusted that they sheared off when I loosened after that with a great deal of force. Unscrewing the brackets that held the air vent cover in position. I scraped more caulk and roof sealer off the flange of the roof covering vent itself. I quickly discovered there disappeared screws or hardware stifling so I offered up on the scratching and went inside the RV After scuffing the caulk and sealant from flange of roofing air vent, no even more screws! Unscrewing the within cover plate of roof covering vent follower in motor home restroom.
Replace Rv Roof Fullerton, CA
A pair sheared off with a great deal of force, yet two wouldn't move. I had to pierce out the screw heads. I picked a drill little bit near to the size of the shaft of the screws that I had currently pulled out and started boring. Selecting a drill little bit for drilling out a screw head.
Security glasses advised. So I drilled out the heads, one popped off and the various other I was getting upset with and provided it a pull before it was drilled through. As opposed to popping off the screw head, the plastic simply disappeared around the hot screw head. Whoops. Hope I don't have to recycle this cover.
Once the braces were out I went back up top to tear out the the roofing vent. There are two cords running to the roofing vent (a black warm cord and a white neutral cable) that you'll need to clip to get rid of the old air vent (Best Rv Roof Repair Fullerton).
Rv Roof Maintenance Fullerton, CA
These are the cords linking the roofing system venting follower. I clipped them simply above heaven splice joints. Roof air vent removed and cleansed up. After clipping the wire and eliminating the vent, I tidied up any type of continuing to be goop and obtained my very first good appearance at the roof covering framework. It's steel! 1 1/2 inches thick.
Some RV roofing systems are mounted with timber, others have steel framework. I scraped off some rust and made a large mess inside the restroom.
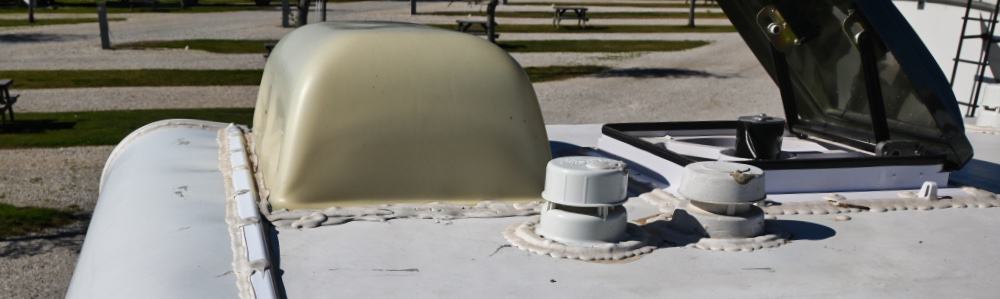
Oops. Maybe I need to have placed a tarpaulin down. My last objective of the day was to get the fridge air vent cover off. I noticed RV sealer blobs at four points on the cover so presumed there must be screws under them. I tore them up and located Phillips screw heads.
Revealing the screws in the fridge vent cap. Removing old motor home roofing system finishing on top of fridge vent cap I additionally saw that there was a coat of motor home roofing coating over the vent cap. These finishes are repainted on with a brush so plainly whoever did this layer just blobbed know top of every little thing.
Rv Fiberglass Roof Repair Fullerton, CA
Raising off the cover of the refrigerator roof covering air vent. Cutting away much more rubber and scraping off Recreational vehicle roofing system sealant and old caulk. Scraping lap sealant and caulk from screw heads.
Tearing off the fridge roofing system vent after all screws are gotten rid of. Nearly every screw was in good sufficient problem to get rid of with an outlet chauffeur, however a pair were too corroded and required to be turned out with vice grip pliers.
Rv Slide Out Roof Repair Fullerton, CA
I peeled off the staying rubber roof from under the flange and afterwards scratched off the old putty beneath. I'll clean it better if and when I determine to recycle it. Appears like it remains in decent shape so I probably will. Removing the old putty from the flange of the refrigerator roof air vent.
That's regarding I jumped on day 1 after regarding 5 hours of lazy job. Not a poor begin. I likewise discovered this incredible scum mold and mildew expanding in the compost under the camper. If you have actually never ever seen a slime mold and mildew, have a look at some time gaps of them growing! They are freaking fantastic! A sludge mold under the camper! Currently proceed to tip 2 when I get rid of the remainder of the roofing system fixtures!.
?.!!. When it concerns RV roofing system substitute, there are several factors to consider. With time, your motor home's roof covering can end up being worn, harmed, or establish leaks, which can jeopardize its honesty and cause even more considerable problems. If you're experiencing any of these problems, it may be time to think about replacing your RV roofing system.
There are several indications that show your motor home calls for a roofing system replacement. These signs consist of water leakages, drooping or soft spots on the roof covering, fractures or divides in the roof covering product, too much damage, and noticeable sunshine coming through the roofing system. If you observe any of these indications, it is crucial to address them quickly to avoid further damage to your motor home.
Rv Slide Out Roof Repair Fullerton, CA
On standard, RV roof covering substitute prices can vary from $2,000 to $10,000. When picking a RV roof covering product, several elements come into play.
Making a decision between a diy (DIY) method or expert setup for your motor home roofing system replacement depends upon your abilities, experience, and readily available time. While do it yourself setup can conserve you cash, it calls for ample expertise and proficiency to ensure an appropriate and leak-proof installment. On the various other hand, professional setup gives the advantage of experience, experience, and guarantees.
Evaluate and clean up the rain gutters and downspouts to ensure proper drainage and avoid water pooling on the roofing system. Apply a safety finish or sealer to the roof covering surface as recommended by the maker.
The price of mounting a RV roof covering can vary based on variables like recreational vehicle dimension, selected roofing system product, and whether professional installation is requested. Usually, you can anticipate to invest in between $2,000 and $10,000 for a RV roofing replacement. Yes, the roofing system of a motor home can be changed. If your RV's roofing system is damaged, worn out, or dripping, a roofing replacement is often required to make sure the architectural integrity of your RV.
Class C Rv Roof Repair Fullerton, CA
Repairing a split in a RV roof depends on the intensity and sort of roof product. For small rips, you can utilize roofing repair work tape or sealer particularly designed for motor home roofings. Bigger rips might call for patching with a suitable roof product or seeking professional assistance. RV roofing coverings can offer extra security and expand the life-span of your roof.
Buying a high-quality motor home roof covering finishing can be worth it for long-term roofing upkeep. Flex Seal items are usually utilized as short-lived or quick-fix solutions for tiny leakages or splits. While they might provide a temporary service, it's advised to seek advice from with a specialist and use appropriate motor home roof repair materials for an extra irreversible and trusted solution.
Repair Rv Roof Fullerton, CA
PVC roofings offer excellent durability, resistance to UV rays, and low upkeep needs. They are considered a trustworthy choice for RV roofing systems, however the best choice depends on your certain demands and preferences.

Resealing your recreational vehicle roof should be done on a regular basis to preserve its stability and avoid leaks. As a basic standard, it's suggested to reseal your RV roof covering at least when a year or according to the manufacturer's recommendations. Whether to leave your RV slides in or out depends upon the circumstance and personal preference.
Think about elements such as safety, climate conditions, and ease when deciding. Motor home roof covering leaks are reasonably common due to different elements such as age, wear and tear, incorrect maintenance, or severe weather condition problems. Regular assessments and proactive upkeep can assist minimize the incident of leakages. The choice to complete a motor home due to water damages depends on the degree of the damages and the insurance provider's assessment.
Rv Rubber Roof Replacement Cost Fullerton, CA
Insurance coverage for recreational vehicle delamination depends upon the details policy and the source of delamination. It is necessary to assess your insurance coverage and talk to your carrier to comprehend the insurance coverage for delamination and any kind of relevant deductibles. Declaring water damage on a camper relies on your insurance coverage policy and the situations bordering the water damages.
Rv Roof Replacement Fullerton, CARepair Rv Roof Leak Fullerton, CA
Rubber Roofing For Rv Fullerton, CA
Rubber Roof For Camper Fullerton, CA
Rv Trailer Roof Repair Fullerton, CA
Replace Rv Roof Fullerton, CA
Rv Rubber Roof Replacement Fullerton, CA
Rv Roof Repair Fiberglass Fullerton, CA
Repair Rv Roof Fullerton, CA
Rv Roof Repair Fiberglass Fullerton, CA
Rv Trailer Roof Repair Fullerton, CA
Rv Roof Repair Service Near Me Fullerton, CA
Rv Trailer Rubber Roof Repair Fullerton, CA
Repair Rv Roof Leak Fullerton, CA
Rv Rubber Roof Repair Fullerton, CA
Motorhome Roof Replacement Fullerton, CA
Rv Trailer Rubber Roof Repair Fullerton, CA
Roof Repair For Rv Fullerton, CA
Rv Roof Maintenance Fullerton, CA
Rv Trailer Rubber Roof Repair Fullerton, CA
Rv Rubber Roof Replacement Fullerton, CA
Roof Repair For Rv Fullerton, CA
Rv Roof Maintenance Fullerton, CA
Repair Rv Roof Fullerton, CA
Resealing Rv Roof Fullerton, CA
Rubber Roofing For Rv Fullerton, CA
Replace Rv Roof Fullerton, CA
Rv Roof Replacement Fullerton, CA
Rv Rubber Roof Maintenance Fullerton, CA
Rv Rubber Roof Replacement Fullerton, CA
Class C Rv Roof Repair Fullerton, CA
Replace Rv Roof Fullerton, CA
Resealing Rv Roof Fullerton, CA
Best Rv Roof Repair Fullerton, CA
Rv Rubber Roof Maintenance Fullerton, CA
Rubber Roofing For Rv Fullerton, CA
Rv Rubber Roof Replacement Cost Fullerton, CA
Rv Rubber Roof Repair Fullerton, CA
Rv Rubber Roof Replacement Fullerton, CA
Roof Repair For Rv Fullerton, CA
Rubber Roof For Rv Fullerton, CA
Rv Roof Repair Fiberglass Fullerton, CA
Resealing Rv Roof Fullerton, CA
Rubber Roof Installation Fullerton, CA
Rubber Roof For Rv Fullerton, CA
Repair Rv Roof Fullerton, CA
Rv Roof Replacement Fullerton, CA
Resealing Rv Roof Fullerton, CA
Rv Rubber Roof Replacement Fullerton, CA
Repair Rv Roof Fullerton, CA
Rubber Roofing For Campers Fullerton, CA
Best Rv Roof Repair Fullerton, CA
Rv Slide Out Roof Repair Fullerton, CA
Rv Rubber Roof Repair Fullerton, CA
Replace Rv Roof Fullerton, CA
Rubber Roof Installation Fullerton, CA
Resealing Rv Roof Fullerton, CA
Rv Roof Maintenance Fullerton, CA
Rubber Roof Installation Fullerton, CA
Rv Rubber Roof Maintenance Fullerton, CA
Rv Roof Replacement Fullerton, CA
Rv Roof Repair Near Me Fullerton, CA
Rv Trailer Roof Repair Fullerton, CA
Motorhome Roof Replacement Fullerton, CA
Rubber Roofing For Campers Fullerton, CA
Rubber Roofing For Campers Fullerton, CA
Rv Roof Repair Fullerton, CA
Rv Roof Repair Service Near Me Fullerton, CA
Rubber Roof Installation Fullerton, CA
Rv Slide Out Roof Repair Fullerton, CA
Rv Roof Repair Fullerton, CA
Rv Roof Repair Service Near Me Fullerton, CA
Roof Repair For Rv Fullerton, CA
Rv Slide Out Roof Repair Fullerton, CA
Rubber Roof For Rv Fullerton, CA
Rubber Roofing For Campers Fullerton, CA
Motorhome Roof Replacement Fullerton, CA
Repair Rv Roof Fullerton, CA
Companies Near Me Seo Pricing Fullerton, CA
Near My Location Seo Marketing Agency Fullerton, CA
OCRV Center
Table of Contents
- – Rv Trailer Rubber Roof Repair Fullerton, CA
- – OCRV Center
- – Rubber Roofing For Campers Fullerton, CA
- – Repair Rv Roof Leak Fullerton, CA
- – Rv Roof Leak Repair Near Me Fullerton, CA
- – Rv Roof Repair Fullerton, CA
- – Replace Rv Roof Fullerton, CA
- – Rv Roof Maintenance Fullerton, CA
- – Rv Fiberglass Roof Repair Fullerton, CA
- – Rv Slide Out Roof Repair Fullerton, CA
- – Rv Slide Out Roof Repair Fullerton, CA
- – Class C Rv Roof Repair Fullerton, CA
- – Repair Rv Roof Fullerton, CA
- – Rv Rubber Roof Replacement Cost Fullerton, CA
- – OCRV Center
Latest Posts
Laguna Hills Vision Insurance For Seniors
Rancho Santa Margarita Key Man Insurance Vs Life Insurance
Buena Park Employee Benefits Consulting Company
More
Latest Posts
Laguna Hills Vision Insurance For Seniors
Rancho Santa Margarita Key Man Insurance Vs Life Insurance
Buena Park Employee Benefits Consulting Company