All Categories
Featured
Table of Contents
- – Motorhome Repair Service Mira Loma, CA
- – OCRV Center
- – Rv Ceiling Repair Mira Loma, CA
- – Best Rv Repair Near Me Mira Loma, CA
- – Rv Mechanics Near Me Mira Loma, CA
- – Rv Floor Repair Near Me Mira Loma, CA
- – Rv Repair Centers Near Me Mira Loma, CA
- – Rv Delamination Repair Near Me Mira Loma, CA
- – Full Service Rv Repair Near Me Mira Loma, CA
- – Rv Solar Panel Installation Mira Loma, CA
- – Rv Service Repair Near Me Mira Loma, CA
- – Motorhome Repair Near Me Mira Loma, CA
- – OCRV Center
Motorhome Repair Service Mira Loma, CA
Marvin Braun, proprietor of Precision motor home, is an RVIA/RVDA Master Licensed Motor Home Service technician and a permanent RVer. He and his better half live with and make use of solar energy on a daily basis. Marvin stays on top of the current innovation, including hybrid inverters and lithium battery systems. He installs systems on all classes of Recreational vehicles including recreational vehicle, 5th wheels, travel trailers, Airstreams and even more.
Execute the best handiwork possible. Offer consumer education and learning on treatment and maintenance of their new solar configuration. Supply the best elements in the market.
Prior to April of 2018, our only boondocking experience in the initial 20 months of taking a trip the nation in our RV, was 3 evenings at a state park in Rhode Island, and one night at a vehicle quit car park lot in Laramie Wyoming. The weekend spent in George Washington State Park near Providence Rhode Island was spent outside, playing in a lake, appreciating the warm summer season weather, and our only electric requirements were for the lights.
The heating system attracts a great deal of energy, and running all night would kill any kind of solitary 12v battery in a matter of hours. That wasn't the minute we chose to get more batteries or anything like that, it was just our only experience with camping off grid for any quantity of time with our Cyclone.
Rv Ceiling Repair Mira Loma, CA
Windy Country appeared to have the market collared on Amazon RV Solar, so I chose them. To get the power out of the batteries, I added 2 standalone electrical outlets directly to the inverter, one in the kitchen for our Instant Pot, and the various other in a very easy place to access for charging and whatever else we required it for.
Although the sun never ever embeds in Alaska, we absolutely had problem with the 3 panels on the roof covering because it was overcast and cloudy the majority of the moment. Fortunately we can bill the batteries a few different means: Photovoltaic panel, when the sunlight occur to be out Alternator, when the motorhome's engine was keeping up the aboard generator We traveled in the Summertime House from April 15th to August 25th and in those 4 months I most definitely discovered a whole lot concerning powering a RV solar off the grid.
Maybe an extra battery (and better batteries), one more panel or 2, and be a lot more mindful of the dimension and size of circuitry I made use of for the numerous links throughout the system. In general it was an excellent low-cost solution that functioned. The major takeaway from that experience was we did NOT intend to hinge on 2 separated outlets; we wanted our recreational vehicle to operate the very same whether it was plugged in or otherwise.
I was looking into panels, inverters, inverter/chargers, charge controllers, batteries, electrical wiring, breakers, battery screens, etc. There is a wealth of details out there, however it was all in some international language that spoke in terms of watts, ohms, volts, amps, scale wiring, hybrid, help, bluetooth, Wi-Fi, and the list goes on and on!
Best Rv Repair Near Me Mira Loma, CA
However we have the capability very swiftly to use a whole lot of electricity. When assuming with the process, and what we wanted to achieve with the system, I kept reflecting to our solar objective statement from the Summer season House, we wanted our motor home to function the exact same whether it was connected in or not! My disclaimer: I am terrific with DC electric systems, but know just sufficient regarding a/c systems to be unsafe.
This blog site is NOT meant to be an outright resource for powering your recreational vehicle, but more to record our construct and journey to being energy independent. I stated above, our 40' toy hauler fifth wheel originated from the manufacturing facility with a solitary 12 volt battery. We had actually replaced it in the previous year, and honestly hadn't actually used it for a lot given that we were constantly connected in.

With that said being said, our 50 amp recreational vehicle has 2 x 120-volt hotlines entering into the recreational vehicle's main a/c circulation panel. They are separated right into 2 "lines", Line 1 and Line 2. Line 1 is the key section of the panel. It feeds 120 volts of air conditioner to the crucial circuits of the RV.
Rv Mechanics Near Me Mira Loma, CA
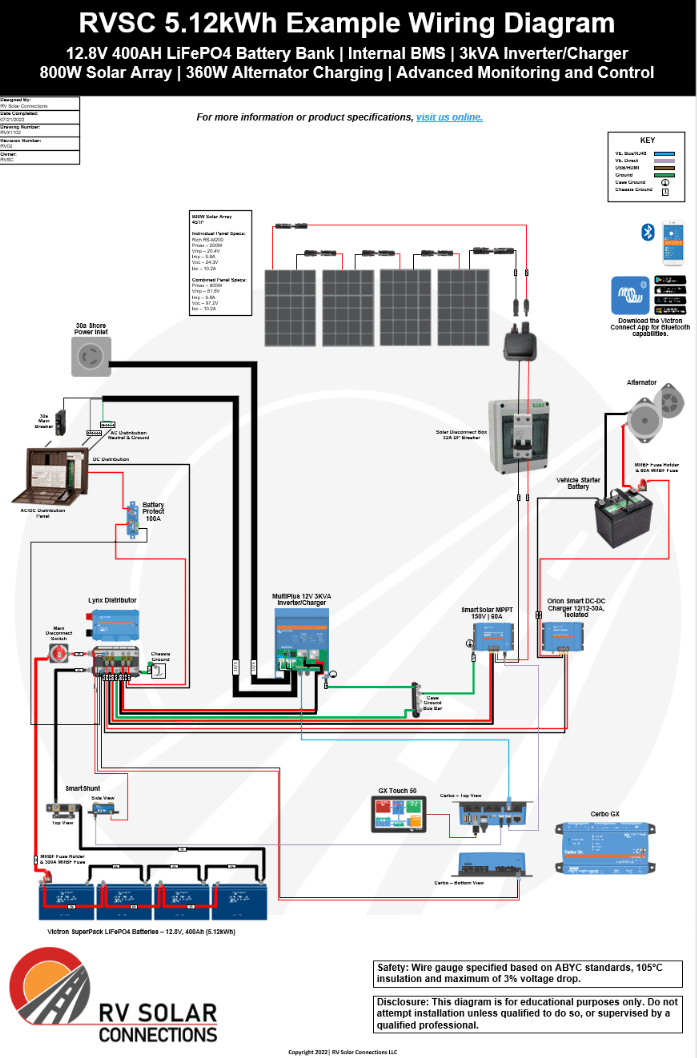
Victron Multiplus Inverter/Charger Several of the installs that I was complying with, all appeared to return to a number of various makers, Magnum and Victron seemed to be blazing a trail. Numerous of my buddies were utilizing Victron components with a whole lot of success and full marks, so I selected their tools for the core of the system.
Yet we will obtain to that later on! Lucky for me, a buddy of ours is a Victron Dealer, and I was able to obtain a bargain on the meat and potatoes of the system. 2 x Victron 12/3000/120 -50 Multiplus Inverter/Chargers These hold true sine wave inverter/chargers, and replace the existing converter battery charger currently in the recreational vehicle.
Rv Floor Repair Near Me Mira Loma, CA
Yet area was a costs up there, and the inverters had certain air void demands. The Generator has a sheet metal shadow separating it from the remainder of the compartment, so I chose to reduce that shroud down 6" to get the additional space I required. I reduced around the shadow, dropped it down, and placed pop rivets to hold it in position.
According to the Victron Guidebook, the inverters can be placed flat or up and down, so I opted to mount them flat on their sides on the wall surface. In doing this, I met all of the needed air voids. The initial wall surface was just" fragment board, so to support the 70lbs that each of the inverters consider, I added a piece of" plywood across the rear of the wall behind them.
Rv Repair Centers Near Me Mira Loma, CA
Considering that we are talking solar system, of course we needed solar panels. There are numerous various alternatives out there for solar panels; in the end I selected to go with Constant Resources for a couple of various reasons.
Among my close friends has one that was split during installment, and it still functioned well! Something I suched as concerning the certain panels I went with is that I could obtain the very same specifications in a square or rectangle-shaped panel. In the end, I selected all rectangular shapes, however had I wanted to (or when I wish to) include more panels, I can obtain the different forms and make much better use of my roofing system room.
Rv Delamination Repair Near Me Mira Loma, CA
We hadn't tilted when, and 1 collection of the turning braces cost even more than the complete set of the Z brackets. So I went spending plan on the mounting braces. A pal of mine that aided me mount the majority of the system instructed me a wonderful means to mount the panels.
We pierced pilot openings, placed dicor in the red, screwed them down and after that covered the base of the brace and bordering roof covering with dicor. The eternabond tape provided it an included layer of water seal, and shielded the rubber from being tore if the steel Z bracket took place to wiggle or move in all.
It is essential to have a plan in location for the circuitry. When you start handling cutting and crimping lugs onto the cables, it gets extremely costly, and you do NOT wish to have to crimp, cut, and kink again. That will cost you $5 or more for every time you overlook cable size and waste a cable lug.
Full Service Rv Repair Near Me Mira Loma, CA
Considering that I was mounting 2 inverters and 2 cost controllers, it was very important to maintain those 2 systems separate. I made use of red and blue cord labels to recognize wiring so I would not get them puzzled. I also used the same red and blue stickers on the components themselves to assist keep things straight.
Obtain on your own a great collection of cutters and a stripper for heavy scale circuitry. Hydraulic kinking device. I was fortunate enough to have a close friend assisting me through the majority of the setup that had this kinking device, and when he left, I had a hard time to find a crimping device to complete the job that really did not entail simply defeating the lugs with a hammer.
I got it off Amazon for less than $30, and it made making my links in between the panels much less complicated. It doesn't have to be very fancy, yet the ability to gauge resistance/continuity and both AC and DC voltage is vital.
Rv Solar Panel Installation Mira Loma, CA
From Home Depot I got a water resistant electrical box about 8"x8"x6". I drilled 5 openings right into the box: 4 x Little holes, one each for circuitry coming from the panels with weather condition evidence fits to keep the elements out 1" hole in the bottom leading the cables via the roof right into the wall surfaces of the RV Inside the box the 10 AWG cables from the panels were entwined onto 6 AWG wires for its trip with the RV to the solar cost controllers Victron elements all function really well with each other and share information.
Along with every one of this wiring, the Inverters and the Battery monitor featured voltage feeling and temperature level feeling cords that had actually to be attached to the battery bank accordingly. Let's begin with the solar circuit. I am running 6 x 200 watt panels set up right into 2 x 3 panel legs wired in collection.
Rv Service Repair Near Me Mira Loma, CA
I located it much more inexpensive to run 2 different smaller sized controllers than 1 larger controller qualified of handling the quantity of power originating from the panels. Additionally, because the 2 strings are running independent of each other, if there is color or absence of angle to the sun on 1 of the 2 strings, it will not impede the power manufacturing of the other string.
Remember; once the panels are in sunlight, they are creating electrical energy, so I used the breaker in this setting to provide me the capacity to isolate them totally from the remainder of the system. From there the circuitry encounters the solar fee controllers in the front area near the battery financial institution.
Once more the point is to not only shield, but to provide me a location to separate the system if need be. The last leg of circuitry in the solar circuit goes from the circuit breakers right into the favorable and unfavorable busbars that are straight tied into the battery bank. Let's maintain selecting the DC (12 volt) system.
Motorhome Repair Near Me Mira Loma, CA
A DC system is a lot more similar to the kind of electric system located in a car. The recreational vehicle's 12 volt system has its own protection and control in position, so I did not modify it any kind of means; I just powered it from the favorable and unfavorable busbars from the battery bank.
OCRV Center
Address: 23281 La Palma Ave Yorba Linda, CA 92887Phone: (714) 909-1444
Email: [email protected]
OCRV Center
This part of the circuit can run extremely high quantities of electrical energy depending upon what you are powering, so this needs significant defense. From the Battery Financial institution, I ran massive 4/o wiring into a 400 amp fuse. This devastating failing fuse is suggested to protect the circuitry in between the inverters and the battery financial institution.
Motorhome Refrigerator Repair Mira Loma, CARv Repair Services Near Me Mira Loma, CA
Rv Floor Repair Near Me Mira Loma, CA
Motorhome Refrigerator Repair Mira Loma, CA
Rv Floor Repair Near Me Mira Loma, CA
Rv Repairs Near Me Mira Loma, CA
Rv Repair In My Area Mira Loma, CA
Rv Service And Repair Near Me Mira Loma, CA
Full Service Rv Repair Near Me Mira Loma, CA
Camper Ac Repair Near Me Mira Loma, CA
Rv Generator Repair Mira Loma, CA
Motorhome Service And Repair Near Me Mira Loma, CA
Rv Repairs Near Me Mira Loma, CA
Rv Refrigerator Repair Near Me Mira Loma, CA
Rv Mechanics Near Me Mira Loma, CA
Rv Service Repair Near Me Mira Loma, CA
Rv Mechanics Near Me Mira Loma, CA
Rv Mechanics Near Me Mira Loma, CA
Motorhome Repair Service Mira Loma, CA
Motorhome Repair Shops Mira Loma, CA
Best Rv Repair Near Me Mira Loma, CA
Rv Generator Repair Mira Loma, CA
Rv Repair Centers Near Me Mira Loma, CA
Rv Repair And Service Near Me Mira Loma, CA
Rv Refrigerator Repair Near Me Mira Loma, CA
Rv Ceiling Repair Mira Loma, CA
Rv Repair Places Near Me Mira Loma, CA
Rv Repairs Near Me Mira Loma, CA
Rv Service And Repair Near Me Mira Loma, CA
Rv Delamination Repair Near Me Mira Loma, CA
Motorhome Repair Shop Mira Loma, CA
Rv Repair Places Near Me Mira Loma, CA
Rv Generator Repair Mira Loma, CA
Rv Floor Repair Near Me Mira Loma, CA
Motorhome Repair Shops Mira Loma, CA
Full Service Rv Repair Near Me Mira Loma, CA
Rv Repair Shops Near My Location Mira Loma, CA
Rv Repair And Service Near Me Mira Loma, CA
Motorhome Generator Repair Near Me Mira Loma, CA
Rv Mechanics Near Me Mira Loma, CA
Motorhome Repair Service Mira Loma, CA
Motorhome Generator Repair Near Me Mira Loma, CA
Rv Repair Services Near Me Mira Loma, CA
Rv Repairs Near Me Mira Loma, CA
Motorhome Generator Repair Near Me Mira Loma, CA
Motorhome Repair Service Mira Loma, CA
Rv Repair In My Area Mira Loma, CA
Motorhome Service And Repair Near Me Mira Loma, CA
Rv Repairs Near Me Mira Loma, CA
Rv Refrigerator Repair Near Me Mira Loma, CA
Rv Solar Panel Installation Mira Loma, CA
Rv Generator Repair Mira Loma, CA
Motorhome Generator Repair Near Me Mira Loma, CA
Rv Repair In My Area Mira Loma, CA
Rv Mechanics Near Me Mira Loma, CA
Rv Repair Centers Near Me Mira Loma, CA
Full Service Rv Repair Near Me Mira Loma, CA
Rv Repair In My Area Mira Loma, CA
Rv Refrigerator Repair Near Me Mira Loma, CA
Rv Repair In My Area Mira Loma, CA
Rv Delamination Repair Near Me Mira Loma, CA
Rv Repair Places Near Me Mira Loma, CA
Rv Delamination Repair Near Me Mira Loma, CA
Full Service Rv Repair Near Me Mira Loma, CA
Best Rv Repair Near Me Mira Loma, CA
Rv Repair Centers Near Me Mira Loma, CA
Rv Floor Repair Near Me Mira Loma, CA
Rv Repair And Service Near Me Mira Loma, CA
Rv Service Repair Near Me Mira Loma, CA
Motorhome Refrigerator Repair Mira Loma, CA
Rv Floor Repair Near Me Mira Loma, CA
Rv Delamination Repair Near Me Mira Loma, CA
Rv Delamination Repair Near Me Mira Loma, CA
Motorhome Generator Repair Near Me Mira Loma, CA
Motorhome Repair Service Mira Loma, CA
Rv Repair Places Near Me Mira Loma, CA
Rv Repair And Service Near Me Mira Loma, CA
Camper Ac Repair Near Me Mira Loma, CA
Find A Seo Consultant Mira Loma, CA
Near My Location Seo Mira Loma, CA
Rv Repair And Service Near Me Mira Loma, CA
OCRV Center
Table of Contents
- – Motorhome Repair Service Mira Loma, CA
- – OCRV Center
- – Rv Ceiling Repair Mira Loma, CA
- – Best Rv Repair Near Me Mira Loma, CA
- – Rv Mechanics Near Me Mira Loma, CA
- – Rv Floor Repair Near Me Mira Loma, CA
- – Rv Repair Centers Near Me Mira Loma, CA
- – Rv Delamination Repair Near Me Mira Loma, CA
- – Full Service Rv Repair Near Me Mira Loma, CA
- – Rv Solar Panel Installation Mira Loma, CA
- – Rv Service Repair Near Me Mira Loma, CA
- – Motorhome Repair Near Me Mira Loma, CA
- – OCRV Center
Latest Posts
Irvine Medicare Supplement Insurance Near Me
Affordable Home Insurance For Seniors Seal Beach
Employee Benefits Outsourcing Companies Fullerton
More
Latest Posts
Irvine Medicare Supplement Insurance Near Me
Affordable Home Insurance For Seniors Seal Beach
Employee Benefits Outsourcing Companies Fullerton