All Categories
Featured
Table of Contents
- – Rv Rubber Roof Replacement Cost Santa Ana, CA
- – OCRV Center
- – Repair Rv Roof Leak Santa Ana, CA
- – Rv Fiberglass Roof Repair Santa Ana, CA
- – Rv Roof Maintenance Santa Ana, CA
- – Motorhome Roof Replacement Santa Ana, CA
- – Rv Slide Out Roof Repair Santa Ana, CA
- – Replace Rv Roof Santa Ana, CA
- – Rubber Roof Installation Santa Ana, CA
- – Repair Rv Roof Santa Ana, CA
- – Rv Roof Repair Fiberglass Santa Ana, CA
- – Rv Rubber Roof Replacement Cost Santa Ana, CA
- – Rv Roof Maintenance Santa Ana, CA
- – Replace Rv Roof Santa Ana, CA
- – Motorhome Roof Replacement Santa Ana, CA
- – OCRV Center
Rv Rubber Roof Replacement Cost Santa Ana, CA
Roofings particularly have a great deal of potential leak locations. Checking around screws and at joints is important to maintaining water from getting involved in the wall surfaces and creating delamination. Bear in mind to have the appropriate sealants available. A roofing system joint and the location around a screw might call for various roofing system sealers.
Some windows aren't completely secured, however it's still crucial to keep the seals that are needed. Walk around your whole RV and check every location of shift or penetration.
Make it a top priority to understand where you have RV sealants and what areas are at danger for fractures and various other damages. Recognizing with the area of all of your sealers makes your sealer check both quick and reliable. Doing that comprehensive check (it can take as little as 15 mins) twice a year can conserve you from the trouble and expenditure of a significant water damage repair service.
Repair Rv Roof Leak Santa Ana, CA
A leaky roof is potentially the most relentless issue for many RVs. Whether it's triggered by dropping branches, freezing water, or some other resource, it appears that water always discovers its method right into Recreational vehicles. Water and Motor homes were not indicated to live with each other, and even a small leakage can lead to dreadful consequences in your RV.
It's all also typical to really feel the drip of a dripping roof covering in your Recreational vehicle. Openings and leakages can happen when warm from the sun triggers the roofing product to warp or soften.
Rv Fiberglass Roof Repair Santa Ana, CA
Regardless of just how the leak happens, when water enters your trailer, the problems will truly start. If your Motor home isn't well-ventilated, the mildew will promptly spread out and take over.
There are many various items on the marketplace, from silicone sealants to tar items, and which product you select will certainly depend on the roof covering material of your trailer. In basic, the application procedures are quite comparable. You'll require to start by preparing the location. Laundry the entire roof covering of your motor home to remove any type of particles, tree sap, dirt, and other contaminants.
Mix up a pail of water with a light cleaning agent (like dishwashing fluid) and apply with the brush. Once the area is tidy and completely dry, locate the issue area.
Rv Roof Maintenance Santa Ana, CA
Adding this safety barrier will certainly help stop any kind of future leaks. At the end of the day, roofing system repair is commonly best left to the specialists.
On top of that, they'll have the ability to identify the level of any damage triggered by the leakage prior to you caught. And also, you'll have the ability to have the comfort knowing the task was done right. Bring your leaky RV by The Outpost RV and talk with our group of knowledgeable motor home service technicians.
Maintain reading to learn some of the ways you can identify and repair recreational vehicle roofing leaks. Not exactly sure exactly how to get begun? Below's a detailed overview I drew up that I wish someone had actually provided me when I began my recreational vehicle journey. When it concerns motor home repair and maintenance, the roofing system should always be inspected very carefully and frequently.
Motorhome Roof Replacement Santa Ana, CA
Now that your recreational vehicle roof is clean, you prepare to secure! However prior to obtaining began, it is necessary to note that when it concerns recreational vehicle roof covering leaks, there isn't a one dimension fits all solution. Each leakage is special and depending upon its dimension and area, it may need a details type of repair.
Motor Home Roofing System Leak Repair Work: Emergencies Benefits: Can be used on a wet surface, making it excellent for a quick solution for smaller sized leaks throughout or after a storm. Pro Idea: See to it to utilize sufficient tape to hide the hole or void entirely, leaving about an inch of tape completely around the afflicted location to get the very best protection.
Rv Slide Out Roof Repair Santa Ana, CA
Motor Home Roofing System Leak Repair Service: Targeting Particular Areas Benefits: Great for a longer-term remedy. Pro Suggestion: Hold the can at a 45-degree angle and apply directly to the issue area being dealt with.
Pro Tip: Before utilizing this item, you'll desire to make sure the surface area is completely dry. Be sure to appropriately evaluate it on a small area initially prior to using it on a big surface.
Use proper safety and security devices like gloves and safety eyeglasses as required. Usage painter's tape and cover the locations you intend to prevent coating, particularly hinges and various other moving parts. While no RV roof lasts forever, proper maintenance is vital for its longevity. With routine assessment and the power of The Flex Seal Family Members of Products, you can help extend your recreational vehicle roofing's life and keep it going strong as you appreciate the fantastic outdoors.
Asen is a permanent RV vacationer considering that 2018 and is the owner of the blog, Camper Life. He enjoys outdoor camping in nature, fishing, and hanging out with his household. Aiming to supply the most important details regarding campers and Motor homes, he shares everything he found out for many years.
Replace Rv Roof Santa Ana, CA
Evaluating the roofing entails closely taking a look at the entire surface, including seams, vents, skylights, and any type of other roof covering elements. This aids in discovering fractures, punctures, splits, or signs of wear and damage. Santa Ana Resealing Rv Roof. Roof Covering Cleaning and Preparation: Prior to carrying out repairs, the roofing ought to be completely cleansed to eliminate dust, particles, and any loose or damaged product
Fixing Leakages: Water leakages are an usual trouble in RV roofings and ought to be resolved without delay. Generally made use of sealants include silicone-based products or specialized Motor home roofing system sealants that are suitable with the roof covering material.
Covering includes utilizing fixing tape, spots, or finishes to cover little areas of damages, while substantial damage might call for changing larger sections of the roofing product. The replacement product must match the original roof material to make sure proper fit and sturdiness. Sealing and Layer: Using a safety roofing sealant or finish is vital to improve the long life and water resistance of the roof covering.
Mobile homes (Motor homes) are a prominent means to take a trip, as they provide the flexibility of the open roadway with the comforts of home. RVs need maintenance simply like any type of other car, and one of the most typical issues is a dripping roof. In this post, we'll discuss why recreational vehicle roofing leakages are a problem and exactly how to fix them.
Rubber Roof Installation Santa Ana, CA
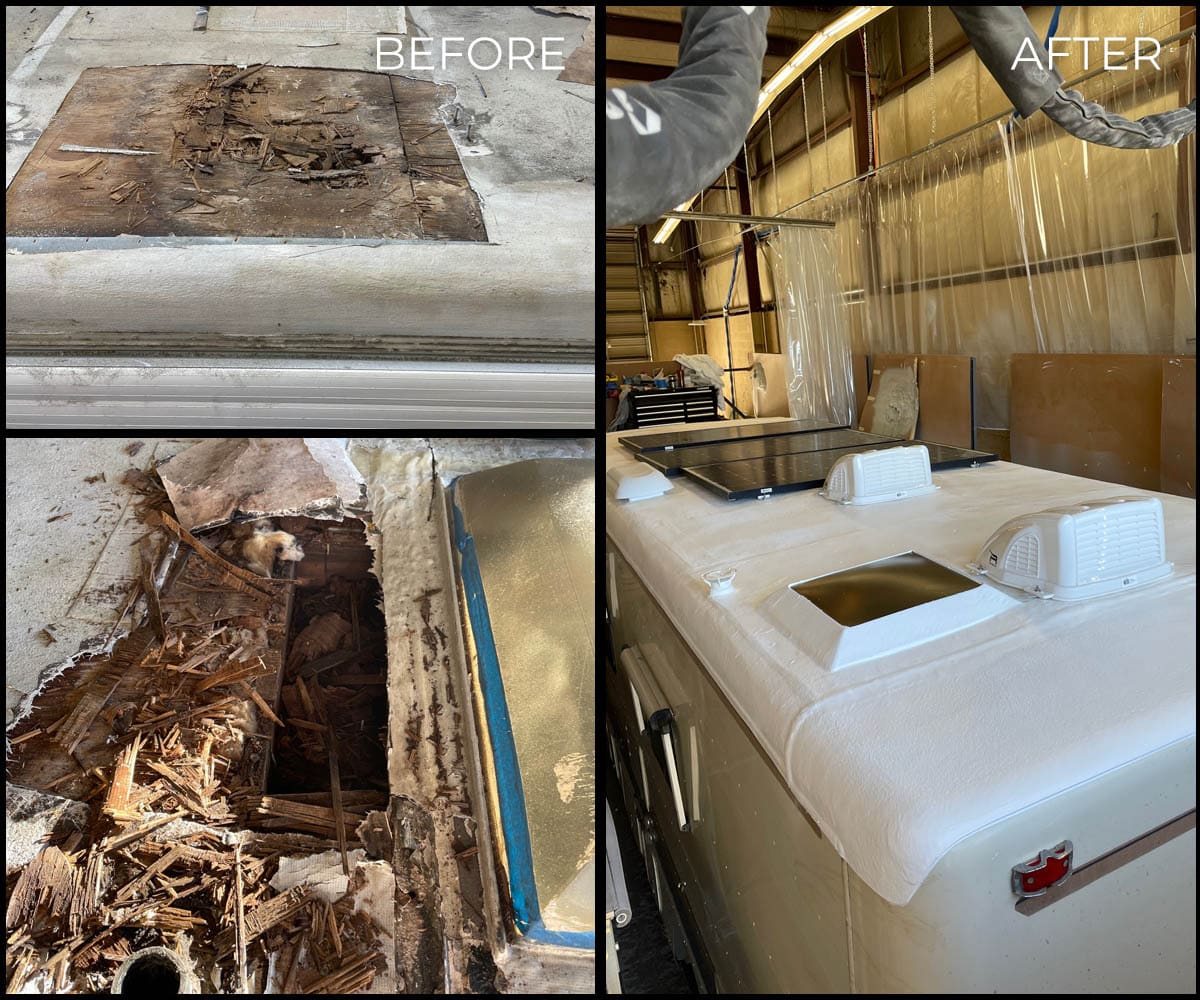
Below are a few of one of the most typical problems that can arise from a dripping RV roofing system: One of the most evident problem that can occur from a leaking roofing is water damage. Water can permeate right into the wall surfaces, floorings, and ceilings of the motor home, causing mold and mildew, mildew, and rot. If left unchecked, water damage can compromise the structural honesty of the RV and cause costly repair work.
Mold and mildew and mildew can trigger health and wellness problems for those that invest time in the RV. If you decide to market your Motor home, a dripping roof will significantly minimize its resale value.
Now that we've gone over why motor home roofing leaks are a trouble, let's check out how to fix them. There are numerous steps you can require to repair a dripping RV roof, depending on the severity of the damage. The first action in repairing a leaking recreational vehicle roofing is recognizing where the water is coming from.
Seek any kind of noticeable splits, holes, or areas where the sealer is weakening. Once you've recognized the source of the leak, you'll require to tidy and prepare the area for repair work. Eliminate any type of dust, debris, or old sealer from the affected location. Utilize a cleaner particularly made for RV roofing systems to ensure that the surface is clean and cost-free of pollutants.
Repair Rv Roof Santa Ana, CA
Use a high-quality sealant that's made for RV roofing systems and is compatible with the existing sealer. After using the sealer, allow it to completely dry entirely prior to exposing it to water.
Examine inside the recreational vehicle for any kind of indicators of water breach, and make any kind of required changes to the fixing. The very best method to manage recreational vehicle roof covering leaks is to stop them from occurring to begin with. Right here are some pointers to help you prevent recreational vehicle roofing system leakages: Inspect your motor home roof covering consistently for any kind of indicators of damage or wear.
Rv Roof Repair Fiberglass Santa Ana, CA
Keep your RV roof covering tidy and free of debris. Regularly tidy the roof with a cleaner especially created for recreational vehicle roofing systems. If you do discover a leakage, address it promptly. Do not await it to worsen, as the damage will just become more serious and pricey to repair. RV roofing system leakages are a typical issue that can cause significant damages to your lorry.
Absolutely nothing ruins a RV journey faster than a leaking roofing. Water can create considerable damage to the inside of your motor home, not to state every one of your possessions. While a RV roof leak can be a challenging task to tackle, you can easily fix it yourself with the right devices and products.
Rv Rubber Roof Replacement Cost Santa Ana, CA
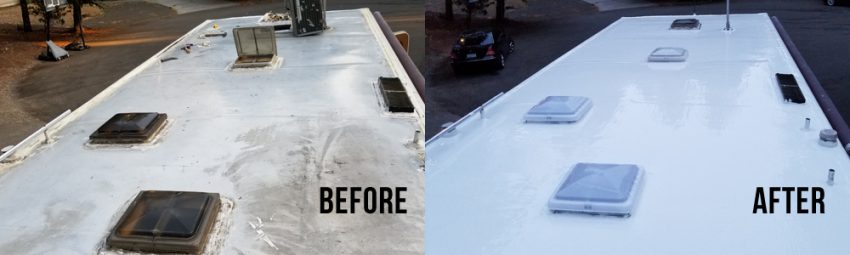
Don't allow a leaking roof spoil your journey - get begun on your RV roofing system fixing today! Prior to you start your recreational vehicle roof repair service, it is necessary to ensure you have the right tools and materials. Look no additionally than our RV Roof Covering Reconstruction Kits-- they include all the materials that you'll require to get this DIY weekend break work done right the very first time.
Next off, use the 100% Silicone RV Roofing Covering to seal your entire roofing. You might intend to use a pail with an angled put spout to spread the coating in areas that you utilize a roller or a brush on to relocate the product about. You'll preferably desire 2 thick layers for optimum security.
Rv Roof Maintenance Santa Ana, CA
When you have actually repaired a Motor home roof covering leak, it's essential to take actions to protect against future leakages. One of the ideal ways to do this is to maintain your roof covering clean and totally free of debris.
Last yet not least, make certain to inspect the roofing after any type of serious weather condition. High winds, hail, or hefty rainfalls can all cause damages to the roof.
Always talk to a professional prior to carrying out roof repairs. There are just two types of Motor homes: those with roof leakages and those that aren't leaking. Keeping your roofing system tidy and appropriately maintained will aid. Still, no amount of maintenance will certainly avert the possibility of roofing leaks. When we acquired our plaything hauler, I was excited to get a RV with a solid light weight aluminum roof covering since, purportedly, aluminum roof coverings never leakage.
Replace Rv Roof Santa Ana, CA
It leaks, and about when a year, I find myself atop a tall ladder on the quest for the most recent leakage, armed with a caulk weapon and much stress. In truth, motor home roofings lose from the components and the roughness of being drawn around the country at highway speeds.
Don't be the individual that brings a caulk weapon onto the roofing and seals over every seam and penetration prior to carrying out a comprehensive inspection. The first thing to look for is obvious damages in the area above where the leak happened.
Motorhome Roof Replacement Santa Ana, CA
If you do not see anything certainly incorrect, concentrate on the joints and penetrations. The joints are the corners and joints where the major straight area of your roof attaches to the vertical walls on all 4 sides. The roof covering infiltrations include the rooftop air conditioning devices, skylights, plumbing air vent pipes, antennas, and exhaust followers.
Inspect the sealant, looking for cracks, separation, holes, or any other indications of deterioration. The procedure is a bit different. Read this next: 6 Tips for Evaluating an Utilized Pop-Up Camper Along with inspecting the seams, I recommend inspecting any kind of pen lights (AKA running lights) on the RV. These are commonly little orange or traffic signals along the top of the outside wall surfaces of the RV.
Picture credit: rain2shine endeavors The extent of the damages and scale of needed fixings are the finest signs of what to do following. Based on your degree of knowledge, experience, and ability, consider what requires to be done and if you can do it securely. Leaning off of ladders and walking on unstable RV roof coverings isn't a fantastic selection for everyone, and it's finest to employ a pro if you have any kind of uncertainties.
Resealing Rv Roof Santa Ana, CARv Fiberglass Roof Repair Santa Ana, CA
Rv Roof Replacement Santa Ana, CA
Motorhome Roof Replacement Santa Ana, CA
Rv Rubber Roof Repair Santa Ana, CA
Best Rv Roof Repair Santa Ana, CA
Rv Roof Repair Santa Ana, CA
Rv Roof Leak Repair Santa Ana, CA
Rv Roof Leak Repair Near Me Santa Ana, CA
Roof Repair For Rv Santa Ana, CA
Rubber Roofing For Campers Santa Ana, CA
Best Rv Roof Repair Santa Ana, CA
Class C Rv Roof Repair Santa Ana, CA
Repair Rv Roof Leak Santa Ana, CA
Motorhome Roof Replacement Santa Ana, CA
Rubber Roof For Camper Santa Ana, CA
Replace Rv Roof Santa Ana, CA
Rv Rubber Roof Repair Santa Ana, CA
Best Rv Roof Repair Santa Ana, CA
Rubber Roof For Camper Santa Ana, CA
Rubber Roofing For Rv Santa Ana, CA
Rv Roof Leak Repair Near Me Santa Ana, CA
Rv Slide Out Roof Repair Santa Ana, CA
Repair Rv Roof Santa Ana, CA
Rv Rubber Roof Replacement Cost Santa Ana, CA
Rv Roof Repair Fiberglass Santa Ana, CA
Rv Roof Repair Near Me Santa Ana, CA
Best Rv Roof Repair Santa Ana, CA
Rv Roof Repair Near Me Santa Ana, CA
Repair Rv Roof Leak Santa Ana, CA
Rv Roof Repair Near Me Santa Ana, CA
Rv Slide Out Roof Repair Santa Ana, CA
Rv Trailer Rubber Roof Repair Santa Ana, CA
Epdm Rv Roof Repair Santa Ana, CA
Rv Trailer Rubber Roof Repair Santa Ana, CA
Resealing Rv Roof Santa Ana, CA
Resealing Rv Roof Santa Ana, CA
Roof Repair For Rv Santa Ana, CA
Rubber Roofing For Campers Santa Ana, CA
Rv Roof Leak Repair Santa Ana, CA
Rv Roof Leak Repair Santa Ana, CA
Resealing Rv Roof Santa Ana, CA
Rv Roof Repair Service Near Me Santa Ana, CA
Motorhome Roof Replacement Santa Ana, CA
Rv Rubber Roof Replacement Cost Santa Ana, CA
Resealing Rv Roof Santa Ana, CA
Rubber Roof Installation Santa Ana, CA
Class C Rv Roof Repair Santa Ana, CA
Rv Rubber Roof Maintenance Santa Ana, CA
Rv Roof Replacement Santa Ana, CA
Replace Rv Roof Santa Ana, CA
Rv Rubber Roof Maintenance Santa Ana, CA
Rv Roof Leak Repair Near Me Santa Ana, CA
Rv Roof Maintenance Santa Ana, CA
Rubber Roof For Camper Santa Ana, CA
Epdm Rv Roof Repair Santa Ana, CA
Rv Slide Out Roof Repair Santa Ana, CA
Epdm Rv Roof Repair Santa Ana, CA
Rv Slide Out Roof Repair Santa Ana, CA
Rv Rubber Roof Maintenance Santa Ana, CA
Rv Roof Repair Santa Ana, CA
Rv Rubber Roof Maintenance Santa Ana, CA
Rv Slide Out Roof Repair Santa Ana, CA
Rubber Roof Installation Santa Ana, CA
Repair Rv Roof Leak Santa Ana, CA
Rv Roof Repair Near Me Santa Ana, CA
Rv Roof Maintenance Santa Ana, CA
Best Rv Roof Repair Santa Ana, CA
Rv Rubber Roof Replacement Santa Ana, CA
Epdm Rv Roof Repair Santa Ana, CA
Epdm Rv Roof Repair Santa Ana, CA
Rv Rubber Roof Replacement Santa Ana, CA
Resealing Rv Roof Santa Ana, CA
Rubber Roof For Rv Santa Ana, CA
Best Rv Roof Repair Santa Ana, CA
Rv Rubber Roof Repair Santa Ana, CA
Rubber Roof For Rv Santa Ana, CA
Rubber Roofing For Campers Santa Ana, CA
Affordable Seo Plans Santa Ana, CA
Find Seo Plans Santa Ana, CA
OCRV Center
Table of Contents
- – Rv Rubber Roof Replacement Cost Santa Ana, CA
- – OCRV Center
- – Repair Rv Roof Leak Santa Ana, CA
- – Rv Fiberglass Roof Repair Santa Ana, CA
- – Rv Roof Maintenance Santa Ana, CA
- – Motorhome Roof Replacement Santa Ana, CA
- – Rv Slide Out Roof Repair Santa Ana, CA
- – Replace Rv Roof Santa Ana, CA
- – Rubber Roof Installation Santa Ana, CA
- – Repair Rv Roof Santa Ana, CA
- – Rv Roof Repair Fiberglass Santa Ana, CA
- – Rv Rubber Roof Replacement Cost Santa Ana, CA
- – Rv Roof Maintenance Santa Ana, CA
- – Replace Rv Roof Santa Ana, CA
- – Motorhome Roof Replacement Santa Ana, CA
- – OCRV Center
Latest Posts
La Canada Flintridge Restaurant Hood Cleaning Near Me
Commercial Hood Cleaning Service Studio City
Panorama City Ac Installation
More
Latest Posts
La Canada Flintridge Restaurant Hood Cleaning Near Me
Commercial Hood Cleaning Service Studio City
Panorama City Ac Installation